Monday 26 September 2011

How to Make A Dress, Part Two: Pattern Markings

I think this series is going to go on for longer than I thought. : )

Last week we looked a sewing pattern envelope; this week we're going inside and will decipher the symbols on a pattern.
We'll start with the grainline. Fabric has what is called a grain. This is the threads that run the long way down the fabric. The grainline has to match this or else the fabrics won't hang right. If you cut off grain your garment can twist when you wear it and become quite uncomfortable.

On the pictures, the ordinary grainline is illustrated on the one on the left. It's the long blue line with arrows on the ends. You just put the pattern piece on your fabric and make sure that the arrows are the same distance as each other from the selvedge or the fold of the fabric.

The other pattern piece has a grainline on which the arrows turn 90 degrees and point to the straight edge of the pattern piece. This is called a foldline and it means that the piece is cut on the fold of the fabric like when you try and cut a symmetrical heart shape out of paper.

Sometimes the grainline is not parallel with the edge of the fabric, but is at a 45 degree, or "bias", angle. You still have to follow the rules as for an ordinary grainline, so the pattern piece will be at a bias angle. Garments are sometimes cut on the bias to take advantage of the draping qualities of bias cut. It takes more care to sew garments this way. Madame Vionnet was the queen of bias cut.


Now we'll look at notches. Look again at the picture. Do you see on the armhole and the shoulder those little triangles? They are called notches, because you cut a notch out of the seam allowance. They help you to sew every thing together in the right place. Not all patterns have them on the shoulder. This one does because there the back shoulder has to be eased to match the front shoulder. You just gather ever so slightly the back shoulder so that it is the same length as the front one. It is easier to do this if you match up the notches (front to back) and pin them. Then you can draw up the easing thread so that the fabric meets with no gaps and no puckers. Then you pin it, baste it, and stitch it. (That wiggly line on the back shoulder tells you that you have to ease there - it is called an ease line).

Anyway, back to notches. Look at the ones on the armhole. There are two on the back and one on the front. This is to help you put the sleeve in the right way around. They match up with the corresponding notches on the sleeve (see the picture to the right). The notch on the top of the sleeve matches up with the shoulder seam on the garment.

(Note: the picture of a sleeve pattern looks weird because it is a rough idea of how a sleeve pattern ought to look. Here is a link with more information: http://www.fashion-incubator.com/archive/sleeve_cap_ease_is_bogus/.)

Another time darts might be used is to mark fold lines:

I have coloured them bright blue on this picture. They are at the top and bottom of the foldline. This pattern piece not be cut on the fold and only one would be cut. It has what is called a cut-on facing - a facing that cut as part of the pattern piece and then simply folded back. Facing the edge this way is especially good for sheer fabrics and for very thick fabrics because it avoids visible seam allowances in sheer fabrics and avoids bulk in thick fabrics.

Also in this picture are buttonhole marks. You just mark these on the fabric with carbon paper and an inkless pen or something. If you have made the pattern longer or shorter where there are buttons you will have to change the position of the buttonholes or it will look like rest of the garment shrank or stretched - kind of like a grown-up wearing their primary school uniform. Just count the spaces between the buttonholes (we'll call that number x), divide the length from the top one to the bottom one by x and mark the buttonholes every x distance. I.e. if the length is 12" and there are 6 spaces between the buttonholes, you have 2" gaps. Measure every 2" inches down from the top buttonhole until you get to the bottom one (which would be the 6th 2" gap). The number of gaps is one fewer than the number of buttons. If you have dramatically changed the length, you may have to add or subtract buttons and use your own judgement as to how many. (I got the formula from Power Sewing by Sandra Betzina which you can find in my Amazon store on this blog.)


Moving on. Looking back at fig. 1 on the bodice front and back you can see two long, narrow triangles. These are darts. Because fabric is flat it would not automatically shrink to fit your waist or grow to fit your bust. So you have to pinch some of the fabric in at the narrow part (waist) and whittle that pinch to nothing near your bust. Hence the triangle you have to stitch (called a dart). Usually on a pattern, there are either notches or circles at the wide end of the dart and a dot at the point. It is a good idea (if your fabric will take marking) to use carbon paper and a tracing wheel to copy the dart onto you fabric. If not, never mind. You will just have to eyeball it when you sew it. (I know "eyeball" is a horrible expression, but what else can I call it? : ))


Anyway, to stay with that topic and move onto the next at the same time, we come to dots and circles. I'll include another picture here to save your constantly scrolling.
Here you can see that the front of the pattern has been copied and traced off to make what is called a facing pattern. A facing is a way of neatening a raw edge that will and keeping it out of sight. At the top and bottom of each centre front there is a small circle. These are not buttons. They are meant to be cut out of the pattern but not the fabric (on unprinted patterns they would be pre-punched). When you have the pattern on the fabric and have cut it out, you make a tailor's tack through the hole. (A tailor's tack is a big, loose backstitch used for marking when chalk won't do. It's removed when you have finished.)

Circles are often used to mark where a pocket goes or where to start and stop stitching on something that is not quite an ordinary seam, like placing appliqué. On a seam, a notch will sometimes show you were to stop stitching, e.g. where a zip goes on a skirt or dress. The dots at the neckline in this drawing might match up with dots on the collar so that the collar is in the right place. (They wouldn't be necessary for putting the facing in place on a simple front like this.)


Now we come to levels. I don't know what they are really called, but they are the little horizontal lines on a sewing pattern that show you where the bust level, waist level, and hip level are.


(Oh, my! I just noticed that the side seams on my quick "sketch" are no where near the same length like as they should be!)


Now we'll look at pleats, and stitching lines.

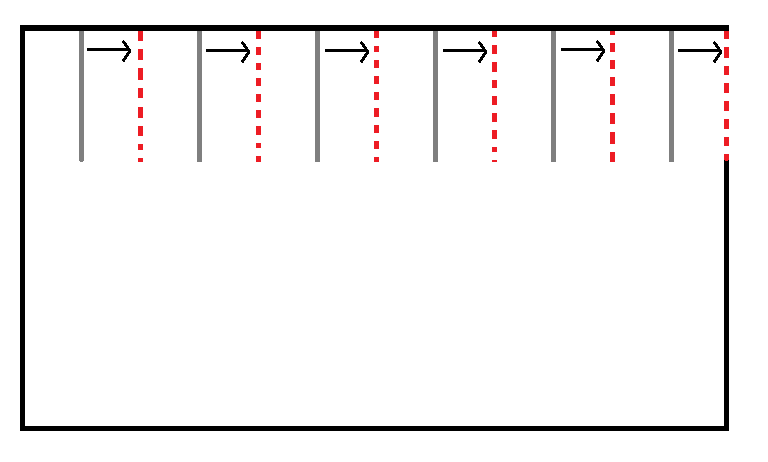
The grey lines in this picture are the fold lines, and the red lines are the stitching lines. It is best to mark them with different colours on your fabric so as not to get them mixed up. You can mark them with carbon paper or with long running stitches (that is called thread tracing. by the way). You take the fold line, pinching it if you wish, fold it, move it in the direction of the arrow, and place it so that it meets the stitching line. Then you pin it and baste it. It is best to use large cross stitches to baste pleats so as to avoid their moving when you sew. If you are using drapey fabrics you cannot baste pleats in place using your sewing machine, because the presser foot will move the pleats out of position and ruin the look.

Stitching lines, by the way are shown with dashed lines; and cutting lines are marked with solid lines.

That covers most pattern markings. If there are any I have missed or that you are curious about, please ask below.

I hope that helps! Until next time, happy sewing!

(By the way, I thought I was the only one to end my posts that way but have since found out I am not. And they're not copying my either - their posts are older than mine! It's just like when we were looking for a corner sofa. It took us ages to find one. As soon as we got it they were everywhere. You couldn't look at a sofa advert without seeing one!)

Sabrina Wharton-Brown
The Sewing Corner Haberdashery, Hornsea, United Kingdom.

Labels: ,

Monday 19 September 2011

How to Make a Dress - Part One: Your Sewing Pattern Envelope

I have finished the Pretty Little Dresses sample dress. Having taken many photos all the way through, and having also used more techniques than were necessary, I am going to do a series of posts on how to sew a dress. Most of the essential sewing techniques are in it, as they are in all dressmaking projects, so while you may be making another dress for your first attempt I hope these posts will be helpful to you.

First we'll look at the back of a pattern envelope. This is not the envelope for pattern 32101 - it's the envelope of the first dress pattern I used, Simplicity 2927 (now discontinued after about ... FOUR YEARS - when did that happen?!). In case you're curious as to what it looks like, I put a photo to the left.

Anyway, the back of the envelope. I'll only show about half of it because the other side is in French.


Garment Description
At the top it says what it is: Misses' Dress or Tunic with Sleeve Variations. "Misses" refers to the figure type. It means grown-up but not what you would call Plus-size. Sometimes the design's size can range from size 4 to size 20. That doesn't mean the pattern in the envelope is in those sizes. It usually ends somewhere in the middle. This one is in sizes 4 - 12.

Fabrics
Below the "title" is a box that names fabric suggestions. These are fabrics that they have tried the pattern in and they know that they work. Of course, you aren't restricted to the fabrics listed. You can choose a fabric with similar characteristics, i.e. if the fabrics they suggest are generally the kind with a good drape, then you can choose a fabric with a good drape; if they suggest firm fabrics like denim, you can use such fabrics. I suppose you could use any fabric you like, but the fabric you use will affect how the garment will hang, how comfortable it is, and it may require different sewing techniques than are in the instructions, e.g. if the fabrics suggested are thin and drapey, and you use a stiff, thick fabric such as cotton drill or denim, then you will have to use darts instead of the shirring that may be part of the design of your chosen pattern.

If there are different types of garments in your pattern, e.g. a blouse and a skirt, there will be fabrics listed for, say, view A and view B because the blouse can be made up in a flimsy fabric, but the skirt ought not to be, and the skirt could be made in, say, denim, but who would want a denim blouse?

Some patterns are sized only for stretch fabrics, specifically knits (jerseys). They probably don't have openings such as zips or buttons, and may be made rather smaller than patterns made for woven fabrics. Knits also drape better than some woven fabrics. Imagine wearing a t-shirt made of denim - the sleeves would stick out and the hang would be terrible! Plus, it would feel too small and restricting because it wouldn't stretch as jersey does.

Patterns made for knitted fabrics have a bar across the top of the envelope on the back called the Pick-a-Knit Rule. A portion of the bar will be black, the rest white. If you have a piece of knit fabric the length of the black part, it must stretch to the end of the white part in order to fit properly. This stretch, by the way, is on the crosswise grain of the fabric - the stretchier way that goes horizontally around your body when you wear it.

Notions
Underneath the fabric suggestions is a list of the required notions. These are things like buttons, interfacing, zips, hooks and eyes, trimmings etc. that you need to make up the garment properly. They are also called haberdashery. It will say the size of the buttons that best fit the pattern (it does matter). You can have them a little bigger or smaller, say, an eighth of an inch (3mm) but it's probably not wise to go beyond that if you want to keep the original look. Plus, patterns are designed for a particular size of button. If you chose another size, you will affect either the design or the fit of the garment, unless you alter the pattern's front piece(s).

Sizes
Here you can find out which size you are. Pattern sizes are not the same as shop sizes. For one thing, they are consistent among pattern companies (except Burda, who use European sizes). Don't worry if you are not just one size. Patterns nowadays are almost always multisized so if your waist is a size 10 and your hips are a size 12, you just draw a line from the waist at size 10 to the hips at size 12 (the levels are marked on the pattern). And anyway, you can always take it in a bit when you try the garment on. It's easy - really.

By the way, if you wonder what the difference is between the pattern companies, it's that they shape things like crutch lines differently. Some may be a gentler curve, whereas others, like Burda, are almost L-shaped.

Another bit of useful information: a crotch is the between-the-legs part on a person; a crutch is that part on a garment.

Yardage/metreage
Now you have your size, you can find out how much fabric you need. This pattern is a Simplicity Inspired by Project Runway pattern so many of the "design elements" (collars, sleeves, pockets, etc.) are given their own yardage/metreage. E.g. for the dress length in size 10, you would need 1 1/4 yds of 60" wide fabric and 3/8 yd for the neckline and so on. Then you would have to add it all up if you were using just one fabric. If you work in metric that is on the French side which you can figure out by counting the rows (design elements/view) and columns (sizes).

If you are using a pattern that is not a Project Runway one, the designs will be labelled as view A, B, C, etc. depending on which garment you want to make and the whole garment will be given a yardage/metreage instead of it's various parts having their own. You can still separate them when you get the pattern if you wish, you will just have to work out how much fabric you need yourself.

The pattern does not only tell you how much fabric you need, it also tells you how much interfacing and lining fabric you need.

Finished Measurements
Your measurements are not the measurements of the finished garment. If they were you wouldn't be able to move. The amount of extra fabric needed for you to move comfortably is called wearing ease. Garments sometimes have more ease than that for the sake of design. This is called design ease. There is also walking ease in skirts and dresses etc. so that you can walk rather than shuffle.

Designs made for stretch fabrics may have negative ease, i.e. they are smaller than you.  Can you imagine a leotard that was the same measurement as the wearer - or larger? It wouldn't look like a proper leotard at all! More like a babygrow. : )

In the bottom box are the measurements of the finished garment. First is the bust measurement; then the length of each view, either from the nape or from the waist depending on the type of garment; and then, in this case, the dress width. The dress width is the circumference of the hemline. You can get an idea of this by having your tape measure in a circle to this measurement and holding it (probably with your legs wide open) at the finished length.

Back view
The drawings to the left are the back views of the garment. With these (if your eyesight is good) you can see where the zip is (if there is one), and you can see where the darts and seams are. You can also see the back view of the collars etc. If the design is a circle skirt, it will show that too by having one side of the skirt held up level with the waistline.


Well, I think that's enough for one post. If you have any questions or comments, please add them below.

Until next time, happy sewing!
Sabrina Wharton-Brown
The Sewing Corner Haberdashery, Hornsea, UK

P.S. I will be posting on Mondays in future. My brother has just started going to college so I get a peaceful morning (in between customers) for writing. Yesterday I started writing this post and he put (of all things) N-Dubz on the television! How can I concentrate with that on? Still, I love Joe really (couldn't ask for a better brother). : )

Labels: ,

Sunday 11 September 2011

Progress Report on Pretty Little Dresses Pattern 32101, And What I Have Learned This Week


I have added a facing to the neckline of dress 32101, sewed it on, and found out that there was a better way to sew the collar. I sewed it on as you would a Peter Pan collar, but as it turns out, I ought to have sewed the point then turned it RS out, and then sewed the collar to the dress. Anyway, I have done it my way now and it's okay (if a little stiff), because I have put the bow on the front and covered up the points of the collar that were sticking out.

The white parts are actually paper to test some design changes. The collar is the same at the front. I thought it needed lowering or widening, but I think it looks better the way it is. The pockets that I have sewn on are too small and too level so I made a paper one that's wider, with rounded corners and pinned it on at a slight angle.


You can see in the picture that the back of the collar is too short for the design, so I "pin-drew" a new collar shape in (the same as I did for the pocket), measured the extra length, traced the existing collar pattern and extended the back part of it. I cut it out of paper and pinned in onto the dress. I think the new length would be better, don't you?

So my lessons this week?
  1. Before making a pattern for a design feature I have never sewn before, I mustn't assume it's the same as something similar; look for specific instructions (the instructions for sewing a Sailor collar are not in any of my sewing books, even the Reader's Digest one!).
  2. Always include a neckline facing pattern even if you can just turn the top collar seam allowance in and slip stitch it, just in case the sewist wants to use a thicker fabric.
  3. Check the proportions of the collar on the design drawing to make sure they end in the right place on the pattern, i.e. how near the outer edge of the collar is to the shoulder, and how far down the back it is.
  4. When sewing an invisible zip (this was my first one) machine-baste the zip in before you sew in it properly; then really open the coil so that it is more or less a 90 degree angle, have the needle at the very edge of the adjustable zipper foot (I don't have an invisible zipper foot) and sew at an angle so that the zip uncoils itself.
  5. When sewing the facing to the dress at the zip opening, have the seam allowances of the dress free (i.e. not sewn back against the dress), so that you can sew all the way up to the corner by machine.  
  6. Clip the seam allowances in the fold of the hem to give a better edge. (I learned this by watching one of Angela Kane's free videos on her website.) 
  7. When hand sewing a seam or even part of a seam, use a doubled thread (a lesson from my wonderful Mum from when she could sew) and make firm stitches. (I still prefer machine stitches because my hand sewn seams are never firm enough except on muslin.)
  8. Using a thimble takes some getting used to, but can save your middle finger from getting sore. It is also very helpful and appreciated when you have to hand sew or baste through thick fabric or several layers of medium-weight fabric.
  9. When sewing corners, don't take too many stitches at an angle or you will get a rounded point. I think maybe two would be enough on this linen fabric.
  10. Sit in a comfortable place when hand sewing; hunching over a hem while sitting on a small stool does one's tummy no good.
  11. Don't hand sew for too long, and do rest your eyes or things start getting blurry.
  12. Commercial sewing patterns cheat when it comes to sailor collars. Instead of using an inset they just leave the bodice as a crew neck and have the front of the collar flop over it so that it looks like it has an inset.
That's quite a lot when you write it all out!

I'm wondering whether to "cover-stitch" the hem on my sewing machine (I've already done a hand cover-stitch). I have also sewn in the inset which was very tricky, but once I had one side in right the other side was easier to do. I couldn't stitch in the ditch of the collar seam because it never worked out right, so I have stitched it to the dress with the stitching hidden under the collar.

So how do you like the design? Please note that this is the fabric I used because it's the fabric I had. If I were making the dress to match the design, I'd have used cotton: navy for the dress, white for the collar and bow, and red for the tie. Plus, I'd have trimmed the hem with ribbon as in the illustration.

What sewing lessons have you learned this week? Please share them below. : )

Until next time, happy sewing!
Sabrina Wharton-Brown
The Sewing Corner Haberdashery, Hornsea

Tuesday 6 September 2011

And it was all sewing so well... And How to Make a Facing Pattern

Pun intended. : )

Sorry I'm late posting this but I wasn't feeling very well on Sunday and I was getting over it on Monday so I watched the first episode of The House of Elliot on ITV 3. Anyway, I'm here today.

This month and during the end of last month I have been making the test garment of pattern 32101. I have got as far as the attaching the collar and have found that the fabric is too thick (medium-weight linen, by the way). At the end of the seam there are 7 layers counting the zip tape. I know adding a facing adds more fabric, but it I have made a facing pattern for the neckline. I think I will have to rewrite the sewing instructions. It's a good job I take photos all the way through. How else would I remember it all?!

I thought I drafted the sleeves with no cap ease, but I had to ease them to fit as well. I have checked the pattern and there is about 3/8 inch ease in the sleeve. Not too much anyway. I think I must have settled for that. (I can't remember for sure.) I am going to get the Metric Pattern Cutting For Children's Wear and Babywear book so that I can make patterns without sleeve cap ease and with better armscyes.

Anyway, I decided to make a tutorial of how to make a facing pattern, in case you have to make one or want to alter a sewing pattern's design.

How to Make A Sewing Pattern For A Facing

First, put your pattern (that will have a facing) down on your table and put some tracing paper (I use greaseproof paper) on top.

I have a tracing wheel ready in the photo, but I found that a pencil was more accurate for this and used that instead.

(Note: I was looking through my issue of SewStyish and found a photo of a needle-point tracing wheel, which my tracing wheel does not look like and isn't. Mine is serrated. I wonder if there is an advantage to having a needle-point tracing wheel?)

The sewing pattern already has seam allowances on the neckline and shoulder seam so I can just draw the facing in without adding them. A facing is usually about 2ins (5cm) deep/wide so I'll add that to the seam allowance width of 5/8 inch (1.5cm) to get 2 5/8 inches (6.5cm) and measure that far in along the neckline, starting at the shoulder and the centre front (C.F.) and then along the rest of the neckline.

(By the way, those "pattern weights" are actually Chinese Ingots -- their version of gold bricks in ancient times. Real ones were sometimes used as money. These are made of brass I think. My Mum and Dad used to sell them in our online shop All About Feng Shui until Dad got too poorly for us to continue the business.)

I don't know how well you can see it in the picture, but I have marked out 6.5cm in from the neckline so that I can get am even curve, which I drew in the next picture:


Then you just cut it out and write the pattern information on it. You can write on it first if you wish, but this is the order I did it in.


The information on the pattern is: The pattern number (32101); the pattern piece name (front neck facing); the figure type and size (girl's, 3); the cutting instructions (Cut 1 on fold of self, Cut 1 on fold of interfacing).

Then you just repeat it for the back facing piece.

So that is how you make a facing pattern.

I first had to make one for a jacket that never turned out right. As the collar never worked out (I tried the pattern twice), I avoided wasting the fabric by turning it into a collarless jacket. The sleeves still feel miles too big, as do the armscyes. I will one day make a jacket pattern the way I want it -- with smaller armscyes and slimmer fitting sleeves. But for now I'm busy.

It is best not to use this method for lowering necklines, especially on loose designs, because they might gape. It is best for closer-fitting things or for removing collars from designs.

Until next time, Happy Sewing!
Sabrina Wharton-Brown
The Sewing Corner Haberdashery, Hornsea.

Labels: