And it was all sewing so well... And How to Make a Facing Pattern
Pun intended. : )
Sorry I'm late posting this but I wasn't feeling very well on Sunday and I was getting over it on Monday so I watched the first episode of The House of Elliot on ITV 3. Anyway, I'm here today.
This month and during the end of last month I have been making the test garment of pattern 32101. I have got as far as the attaching the collar and have found that the fabric is too thick (medium-weight linen, by the way). At the end of the seam there are 7 layers counting the zip tape. I know adding a facing adds more fabric, but it I have made a facing pattern for the neckline. I think I will have to rewrite the sewing instructions. It's a good job I take photos all the way through. How else would I remember it all?!
I thought I drafted the sleeves with no cap ease, but I had to ease them to fit as well. I have checked the pattern and there is about 3/8 inch ease in the sleeve. Not too much anyway. I think I must have settled for that. (I can't remember for sure.) I am going to get the Metric Pattern Cutting For Children's Wear and Babywear book so that I can make patterns without sleeve cap ease and with better armscyes.
Anyway, I decided to make a tutorial of how to make a facing pattern, in case you have to make one or want to alter a sewing pattern's design.
How to Make A Sewing Pattern For A Facing
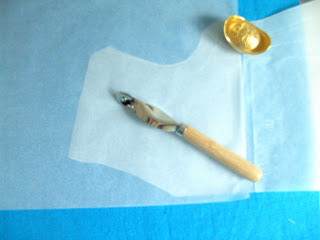
First, put your pattern (that will have a facing) down on your table and put some tracing paper (I use greaseproof paper) on top.
I have a tracing wheel ready in the photo, but I found that a pencil was more accurate for this and used that instead.
(Note: I was looking through my issue of SewStyish and found a photo of a needle-point tracing wheel, which my tracing wheel does not look like and isn't. Mine is serrated. I wonder if there is an advantage to having a needle-point tracing wheel?)
The sewing pattern already has seam allowances on the neckline and shoulder seam so I can just draw the facing in without adding them. A facing is usually about 2ins (5cm) deep/wide so I'll add that to the seam allowance width of 5/8 inch (1.5cm) to get 2 5/8 inches (6.5cm) and measure that far in along the neckline, starting at the shoulder and the centre front (C.F.) and then along the rest of the neckline.
(By the way, those "pattern weights" are actually Chinese Ingots -- their version of gold bricks in ancient times. Real ones were sometimes used as money. These are made of brass I think. My Mum and Dad used to sell them in our online shop All About Feng Shui until Dad got too poorly for us to continue the business.)
I don't know how well you can see it in the picture, but I have marked out 6.5cm in from the neckline so that I can get am even curve, which I drew in the next picture:
Then you just cut it out and write the pattern information on it. You can write on it first if you wish, but this is the order I did it in.
The information on the pattern is: The pattern number (32101); the pattern piece name (front neck facing); the figure type and size (girl's, 3); the cutting instructions (Cut 1 on fold of self, Cut 1 on fold of interfacing).
Then you just repeat it for the back facing piece.
So that is how you make a facing pattern.
I first had to make one for a jacket that never turned out right. As the collar never worked out (I tried the pattern twice), I avoided wasting the fabric by turning it into a collarless jacket. The sleeves still feel miles too big, as do the armscyes. I will one day make a jacket pattern the way I want it -- with smaller armscyes and slimmer fitting sleeves. But for now I'm busy.
It is best not to use this method for lowering necklines, especially on loose designs, because they might gape. It is best for closer-fitting things or for removing collars from designs.
Until next time, Happy Sewing!
Sabrina Wharton-Brown
The Sewing Corner Haberdashery, Hornsea.
Labels: sewing


3 Comments:
Hello Sabrina,
just found your web site today and am browsing through it
I am a beginner sewer and am enjoying it,
the little girls dresses are so pretty! Keep it up!
I think I read/heard somewhere that the tracing wheel with a "spiked" wheel is used in for pattern making, tracing through railroad board to actually mark the pattern? am not completely sure but I seem to remember that..
anyway thanks for all the great tips...
now I will keep reading..
Barbara
P.s. I love the little chinese ingots you use as weights!
(Barbara)
Thank you for your kind comment. :)
I found out afterwards that a needlepoint tracing wheel (which is much sharper than my serrated dressmaker's tracing wheel) is used by pattern makers to trace patterns. I think my serrated on is fine to use on tracing paper as long as I have some fabric underneath. The holes are big enough for me.
Sabrina
Post a Comment
Subscribe to Post Comments [Atom]
<< Home