
"Sewing Machine Presser Feet Cheat Sheet"
Back in the '20s and such times when sewing machines only sewed a straight stitch, they came with a selection of attachments instead. There were surprisingly many. They didn't call them presser feet though, they called them attachments. The only one that was called a presser foot was the straight stitch foot.
Some of those old, antique attachments are now manufactured to fit modern sewing machines better, but some have (sadly) been left in the past or "updated" (sigh, still not the same).
For now, let's look at some of the more popular (and handier) presser feet and attachments made for our modern sewing machines.

In case you are wondering what that little black button is, it's a foot leveller. If you are starting sewing a seam on thick fabric, you push that button in before you lower the presser foot and it holds the presser foot level. When the hole foot is supported by the fabric, the button will pop out again. It works only with the shank that has a hole in the right place for the pin on the button, so if it didn't come with your sewing machine, it probably won't work on it.

This is a two-sided zipper foot. It snaps onto your sewing machine like any other snap-on presser foot, but instead of snapping on in the centre, you snap it onto either the left or the right side of the centre of the foot. It lets you get closer to what you are sewing than you can get with the standard presser foot.
https://www.singermachines.co.uk/sewingmachineparts/feet/singer-blind-hem-foot.html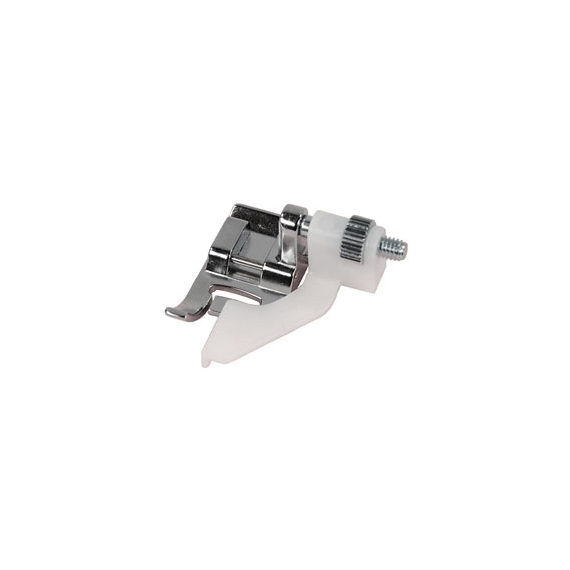
This is an Adjustable Blind Hem Foot
. You turn that little wheel on the right-hand side to move the white guide left or right. The fold of the fabric buts against the guide and the machine sews a blind hem, catching just a little of the fold in the swing of the stitch. There are instructions for machine sewing a blind hem on this blog.
This is an overlocking foot, also called an Overcasting Foot
,
even though it is for a sewing machine and not for an overlocker/serger. There is a metal guide against which you butt the edge of the fabric. Using a zigzag stitch or any other overcasting stitch on your sewing machine that will fit, you neaten the raw edge to prevent it from fraying. When I say "that will fit" I mean that won't have the needle hit the guide of the foot on its way down.
If your sewing machine's zigzag stitch is centerised as opposed to being always aligned to the right, this foot is near essential for overcasting because you can't use the sewing machine needle plate as a guide on such a sewing machine.This is a Satin Stitch Foot, also called a monogramming foot, and possibly an embroidery stitch foot. It looks very like a standard presser foot, except it may be wider and it has a deeper tunnel underneath for the denser stitching to go through smoothly. If you tried satin stitching with your standard presser foot, the fabric might not feed through because the stitches wouldn't fit under your standard presser foot. It would be like trying to get a lorry under a too-low bridge.
It is to be used for decorative stitches only, and not sewing seams because, due to the higher tunnel; I don't think it will hold the fabric down against the needle plate flat enough.
Back when sewing machines usually did only a straight stitch, they invented a zigzag attachment. You could put different cams on top of the Singer one and they would sew different decorative stitches.
http://www.april1930s.com/html/singer_adjustable_zigzag_attac.html
http://www.youtube.com/watch?v=hgHQW38MWYE&feature=relatedThis is a Button Sewing Foot. You use it with the feed dogs down or covered because you want the fabric and the button to stay put.
It goes on your sewing machine with the blue end facing you and the button underneath. Then you set your sewing machine at a zigzag stitch whose width lets the needle go down the holes on the button. If you want to have a thread shank on the button, you put a matchstick or something like that on top of the button between the holes. That makes the stitches take more thread. When you have finished stitching the button on, you leave long thread tails, bring them under the button and wrap them around the threads. Then you bring them to the back of your fabric and tie them off.
With the sliding buttonhole foot you have to measure the button and make the buttonhole in 4-steps on your sewing machine. You cannot use this foot on a sewing machine that makes a 1-step buttonhole.
With the automatic buttonhole foot, you just fit your button in the gauge at the back of the foot, lower the presser foot, and pull down the buttonhole lever on your sewing machine. It is important to raise the lever after every buttonhole and pull it down when the presser foot is down because if you don't you may not get good buttonholes - one side will be shorter than the other.
There are a few other kinds of buttonhole feet, like the Bernina Buttonhole foot and the Janome Long-Buttonhole Foot, but your instruction manual or manufacturer's website should tell you more about them if you have them.
In the old days they made an attachment called a buttonholer. It was like an extra machine that attached to your sewing machine. They could also be used to make satin stitches on a straight stitch sewing machine! Apparently you can you them on modern sewing machines but get better results on the vintage kind they were made for. http://www.april1930s.com/html/singer_buttonholer.htmlThis is a concealed zipper foot, also called an Invisible Zipper Foot
. An invisible zip is different to an ordinary zip in that the chain is on the inside; they are also curled up. When you sew it on you have to get into the groove and stitch it onto the stitching line of your garment. The foot has two tunnels underneath for the coils to travel under. The foot helps uncurl them as you go, making the job a lot easier than it would be if you were to put an invisible zip in with an ordinary zipper foot or an adjustable zipper foot.
There are videos on YouTube of how to do insert invisible zips.
 This is an Adjustable Zipper Foot, also called an adjustable piping foot or an all purpose zipper foot.
The bar on the right is where the slide is. This controls how far left or right the foot is - hence adjustable zipper foot. Make sure you tighten the screw on the bar as far as you can or the foot will move forward when you lower it and will cover the needlehole. For some reason, the stitch automatically shortens by about 0.5mm unless you have stablizer or something top and bottom. I think it's because there is less of the fabric in contact with the feed dogs.
It is essential for sewing piping that won't fit under the two-sided zipper foot, e.g. welting in soft-furnishings.
This is actually a really old style of presser foot. They made them for the old Singers. http://www.april1930s.com/html/narrow_zipper_cording_foot_att.htmlThis is a Darning/Free Motion Quilting Foot. It has a spring on it that works in unison with the needle; when your needle goes down, so does the presser foot, when the needle goes up, the presser foot is above your fabric so that you can move it around as you wish, even though the presser foot lever is down.
You use this foot with the feed dogs down or covered.
To darn with it, you put the fabric in a hoop and sew back and forth across the rip and then left to right across it in a thread colour-matched to the fabric.
It looks a lot like the Free-motion Embroidery foot except that the bottom of the foot is a whole shape, and the one on the Free-motion embroidery foot is open-toe, i.e. it has a gap at the front.
They had these for antique sewing machines as well. I wonder if any of our attachments are new ideas?
http://www.april1930s.com/html/singer_featherweight_222k_embr.html
I think a free-motion quilting foot is probably tougher for heavier weights of quilting.
This is an Edge Joining/Stitch in the Ditch Foot
To use it to join edges you have one piece of fabric with its edge on the left-hand side of the guide, and another piece of fabric with its edge against the right-hand side of the guide.
If you would like to see the antique version of this foot and how it's used, take a look at this website: http://www.april1930s.com/html/singer_edge_stitcher_attachmen.html
Personally, I rather like the antique version. You could still make pin-tucks with it. I wonder if they made the new kind to take thicker fabrics?
I have found a foot almost exactly like the antique one, but manufactured now! It is part of a set at Amazon.com. I'm not sure whether they are available in the UK, though
http://www.amazon.com/Distinctive-Rolled-Hemmer-EdgeStitcher-Package/dp/B0035UU8VI/ref=pd_sbs_ac_4
This is called a 1/4-inch Foot. This one has a metal guide along the right-hand side to keep your fabric aligned. The little notches on the left-hands side are so that you can pivot and keep the seams equal.
This is a Gathering Foot. The longer your stitch, the more gathered your fabric will be. The fabric you put underneath your gathering foot is the fabric that will be gathered. There is a slot for you to put another piece of fabric through. The fabric in the slot won't gather. This is so that you can make a gathered piece of fabric and sew it to a flat one at the same time.
You can do that with a Ruffler foot, but the gathering foot is cheaper (because it does less and is easier for them to make).This is a binding foot. It works kind of like a bias binding maker in that it curls the fabric into the right shape as you go. The advantage is that it sews the binding to the edge at the same time. There are different sizes available for different sizes of binding. The size refers to how wide the binding will be when folded in half and stitched onto your fabric, so it's half the size of the bias binding.
If you have already pressed your bias binding or if you bought it ready-made, you may prefer the Adjustable Binding Foot, which is also called a taping foot. It can take various widths of bias binding and tapes. It won't curl the binding for you, but that is already done if you have purchased binding or if you have used a bias binding maker.
You can see the little wheel in the lower right-hand corner of the picture. That moves a guide inside the plastic bit of the foot to keep the binding in place as you sew it to your fabric.
These are Narrow Rolled Hem Feet. They come in various widths and take a bit of practice to use. You can use them to make a narrow rolled hem on your sewing machine. The narrower ones are for fine fabrics like chiffons and silky fabrics, but you can use the much wider ones (e.g. 3cm) for medium weight fabrics like ordinary cottons and so on. I don't know about heavier/thicker fabrics.
There are variations of these feet such as the picot edge feet with which you use a zigzag stitch or an over-casting stitch with higher-than-usual upper tension. It is supposed to bring the edge of the fabric up a bit so that when you have the fabric flat, there is a picot edge. There is also the felling foot which allows you to more easily make seams like those on the back of your jeans (felled seams).
This is a Walking Foot
, also called an Even Feed Foot. How does it work? Well, you know how your sewing machine has feed dogs that push the fabric through? Well, sometimes when you are sewing several layers of fabric, such as in quilting, the top layer doesn't go through at the same speed as the bottom one because it has nothing to push it through simultaneously. This means that when you get to the end of your seam, looks like one piece of fabric is longer than the other.
That is where the Walking Foot come in. It has some 'feed dogs' in it that push the upper layer through so that both layers go through at the same rate, hence even feed.
There is also an open-toe version of this foot so that you can more easily see where you are stitching.
If you have a Pfaff with Integral Dual Feed, you don't need one of these; your sewing machine will do it for you. The same is true if you have a Janome Horizon.
The stick-thing that is next to the foot in the photo (that looks like a shepherd's crook) is a seam guide. You slide the bar of it through the correct part on your shank, and the hook bit, which is at a right angle to the bar, works like the stitching guides on your needle plate, but you can adjust how far it is from your needle. This doesn't always come with your Walking Foot, and may be available separately.
This is a Pintuck Foot. You use is with a twin needle. There are tunnels underneath that make the pin tucks. The guides also help to keep your twin-needle pin-tucks parallel. If you put a strand of cord underneath your stitching the pin-tuck you are stitching, you can make corded pin-tucks. Some sewing machines have guides available for the cord.
There are a few different pin-tuck feet with different sizes of tunnels and different numbers of tunnels.
This is a Cording Foot. Can you see the little tunnels on the top in front? They are for the cords to go through. I think on this one you can 'clip' them in by sliding them under the little sticky-up bit at the side of the tunnels.
You can use this foot to sew over a number of cords at once and have them all be parallel.
There are different cording feet available for different quantities of cords.This is a Welting Foot
. It is a bit like an invisible zipper foot except that the tunnels are bigger underneath (it looks like a toad-in-the-hole with the sausages removed). You can use it to sew right up close to the welting (which is like thicker cording).
Labels: sewing
posted by SWB @ July 31, 2011
24 Comments
![]()
![]()

24 Comments:
Thank you so much for sharing this... very useful.
This has been so useful. Thank you.
Thank you both very much. :)
Great information. I've been sewing for many, many moons and still have no idea how half of my feet work! I'm going to share the link to your blog in my sewing team at Etsy. Someone just posted about wanting to learn how to sew.
I am a new sewer and this information was very useful. Thank you!
this is very useful, do you know what type of pressure foot do i have to use for the picot stitch.
thanks.
You can use a satin stitch foot, or a picot foot (which is like a rolled hem foot but with a bigger tunnel underneath).
That was very useful! Thank you! I still can't work with the hemmer feet (even after watching a video on youtube!) but I will keep trying.
This tutorial is a godsend! I inherited an old sewing machine (which I love) and some feet, but I had no idea what the feet were. Thanks SO MUCH!
I now can make a chart. Thanks!
I have a question regarding even feed (walking foot attachment). I have a Singer 404 Slant needle, non walking foot machine, I also have a walking foot attachment pictured above. I wish to do some welting/piping for a boat I'm restoring however I need a walking foot to push through the layer of vinyl. If I move to Welting as well I wont be able to get close enough to the plastic welting for the stitch with this attachment. I have a zipper foot but I then lose the use of the walking foot.
Are there different feet I can get to clip onto the even feed/walking attachement?
Perhaps it would help if you put talcum power or something on the upper fabric (that goes under the presser foot). It might stop it from sticking to the zipper foot. Otherwise, I'm sorry but I don't know what to suggest.
What a great help! I was bouncing back and forth between low-shank and snap-on definitions and then I landed here. Thank you for the terrific information.
Some thoughts for Fair Dinkum: I know there are dual feed attachments out there that allow you to change feet - but probably not the one you have. Have you tried basting welting with zipper foot using either microtex or leather needle and then using walking foot? Just thinking....Good luck!
Thanks for the suggestions, After a few tries I decided not to go the piping route, rather a normal stitch, folded the re-stitched (one fold seam). This machine isn't quite capable for the layers and getting close enough to the piping, using marine vinyl!, I considered a French seam, but didn't have anything suitable for backing.
Future purchase - a walking foot machine.
Excellent post! Thanks. :-)
Thank you so much! I've been sewing for ever, and until now I have been doing all these things by hand, not even thinking that there would be a foot that would do it for me! I wonder - do you know of a foot that would sew a bias tape armhole facing easily? Or would it be possible, do you think, to sew the bias tape on, and use a hemmer foot to turn it and stitch it down evenly?
There is an old-fashioned binder attachment that I read about at vintagesewing.info (now only on Google's Wayback Machine) in a book called The Nu-Way Course in Fashionable Clothes-making. I haven't used one because I don't have one, but there is a photo here. It's supposed to fold the tape and sew it down in one go.
http://www.april1930s.com/html/singer_binder_attachment.html
Thank you so much for sharing your knowledge with us. I am am fairly new to sewing and have several of these feet with the machines I bought. I knew what some were for, but you have taught me new uses for them all.
Well, the list of presser feet tutorial would be
great if there was a picture of each one. But how
do I know which one you're talking about?
There are lots of pictures. It seems that some computers don't show them though; I think it might be because of Internet Security programs.
You may want to run a virus program on this document. I downloaded it and a virus was attached to it.
Thank you.
Hi - I found a box set of machine feet (clip on) on eBay that only cost £14.95 with free postage. Can't post a picture but the title is "1 SET OF 18 MIXED FOOT FEET FOR DOMESTIC SEWING MACHINES UNIVERSAL FITTING" if anyone wants to check this out.
You just saved me $10. :) I had ordered an overlocking foot, only to find I had an overcasting foot in my supplies with my new machine! I didn't know they were the same thing until I read your review! Thanks so much for the detailed use of each foot. It's been a tremendous help and I will always come back to it if I have any doubts as I get used to each.
When working with vinyl as your top layer, one way to keep it from sliding around is to line it with tissue paper, which is easy to tear away when finished.
Post a Comment
Subscribe to Post Comments [Atom]
<< Home