Monday 31 October 2011

How to Make a Dress Part 6: The Collar

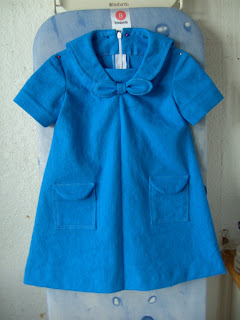
( I have added the pictures of the dress I made for this series as a reminder of what it looks like.)

All last week (half-term) my brother had a cold, and now I have it, so I will just make this post about the collar. Sorry to cut it short.

How to Make A Collar
Sometimes (in better patterns) there are two collar pattern pieces: the top collar and the under-collar. The top collar is the one that you will see when the garment is worn; the under-collar is like a collar facing (I think it's sometimes called that) and it goes underneath (hence the name).

If you have not already interfaced the top collar, do so now. The top collar is slightly larger and a slightly different shape to the under-collar. This is so that the seams roll out of sight when the garment is finished; it also makes the collar a better shape. It makes it a little fiddlier to get the pieces ready to sew, but the end result is worth it.

Match up and pin the corners first, and then the raw edges, keeping the extra fabric of the top collar evenly distributed. Now hand-baste in place. You don't have to pin and baste the neck edge - you will only have to undo it again later.

In the photo below, the under-collar looks rather wobbly because the larger top collar is eased onto it underneath (RS together).


Now you just have to sew from the back neck point to where the collar meets the front of the neckline. For the sailor collar I should have sewn right around the point to maybe 2 inches towards the neck to make it easier later, but I assumed that a sailor collar, being flat, would be applied like a Peter Pan collar. I was wrong, apparently, so these instructions are going to be for a Peter Pan type collar. : )

When you sew the corners, take a diagonal stitch or two. Ironically, this gives a sharper point when you turn it RS-out. It's because the fabric is thicker than paper and needs the space of the diagonal corner to lie flatter. Otherwise it will be all pushed together like inside the finger-tips of a glove.

Then you trim the seam allowance of the top collar to half. This will make it lie more smoothly when turned RS-out. You also need to trim the corners so that there will be less bulk. First, snip the corner off, about 1/8 inch out from the stitching, then whittle the seam allowances to a narrower point. I didn't take a photo of that so I've just whipped a drawing in Paint. It's a little scruffy, but I hope it serves its purpose.
Now you can turn the collar RS out and it is ready to sew onto the dress later.

I hope that helps!

Until next time, happy sewing!
Sabrina Wharton-Brown
The Sewing Corner Haberdashery, Hornsea, East Yorkshire, HU18 1AP

Labels: ,

Monday 24 October 2011

How to Make a Dress: Part 5 - How to Prepare Facings and Sleeves for Sewing into the Dress

If you follow sewing pattern instructions you will make the garment pieces as and when you need them. That's fine, but if you are an organized sort of person or you want to be, you can make the smaller parts up before-hand so that you can just apply them when the time comes, kind of like they do in factories, except you're make only one item (or so I presume).

We'll start with the facings.

How to Prepare a Facing
It's easy really. Once you have stay-stitched the edges and interfaced the facing, you put the seam allowances that are to be joined RS together and stitch. On this dress there was a neckline facing and the seams were shoulder seams.

Here the front neck facing is underneath the back neck facings, which overlap because of the seam allowances:


Once you have stitched the seams of the facing, you press them flat (as they are when you take them away from your sewing machine), then you press them open, and overcast or zigzag their raw edges. The interfacing is trimmed in the seam allowances to reduce bulk:


We'll apply the facing later.


How to Make a Sleeve
The sleeve on this dress is a simple short sleeve with a hand-stitched invisible hem (machine-sewn invisible hems are seldom actually invisible). The front of each sleeve has one notch and the back has two notches (also called a double notch). This is so you know where to start ease-stitching, and also to help you put the sleeve in the right way round. There is also a notch at the top of the sleeve to match the shoulder seam.

Here I have sewn the seam (you can see the hem area is interfaced for a better finish) and trimmed the seam allowance in the hem area to reduce bulk.

(You can see in the seam allowance of the sleeve cap I have clipped one of the notches rather than cut a notch shape outwards of the seam allowance. I do this because it's quicker and easier.)

Now we shall sew the hem of the sleeve. If you were making the garment for someone in particular, or for yourself, you could leave this part until you try the garment on to make sure that you get the sleeve the right length.


How to Sew An Invisible Hand-Hem
This hem allowance is 1 1/4 inches deep (about 3cm) and there will be two turnings: one deep one (1in deep), and the other (1/4 inch) to fold under the raw edge.

First, fold the hem allowance up 1 1/4 inches all the way around. This is a good place to use your sewing gauge if you have one (I made mine) or you can use a tape measure if you prefer. Once that is level, turn under the remaining 1/4 inch so that the hem is 1 inch all around when viewed from the inside (as shown at left). Now pin in place and baste if you wish.

On the seam allowance of the sleeve seam (which I probably ought to have overcast earlier) secure your thread for hemming as in the top photo below.


Then go into the hem allowance and bring the needle through about 1/8 inch to 1/4 inch along. Pick up one thread of the sleeve and then repeat. Keep going until you get to the starting point again. Then you just secure your thread and cut it off.

If you have to start a new thread as you go along the hem, secure it in the hem allowance so that it is invisible.

Et Voilá! You have your hem, and it is invisible from the RS.

When it comes time to set the sleeves, I will show you a neat trick that I learned from Power Sewing by Sandra Betzina for easing the sleeve caps much more easily.

I had planned to include the collar, bow and pockets in this post, but I haven't time. Never mind, we will continue next week.

Until next time, Happy Sewing!
Sabrina Wharton-Brown
The Sewing Corner Haberdashery, Hornsea, East Yorkshire, HU18 1AP

Labels: ,

Monday 17 October 2011

How to Make a Dress Part 4: Stay-stitching, Interfacing and Hand Overcasting

The gas-man came on Thursday and put the heating back on. Apparently the smell was due to our flu; flues are easily affected by the wind and that was what was sending the dreadful smell into room. It wasn't gas; we don't know what it was, it just smelled awful. Anyway, back to the dress...

Stay-stitching
The first thing to do is staystitching. Stay-stitching is sewing along all the curved and bias edges so that they maintain their shape, i.e. so that they stay the same. It's easy to do, you just machine-sew along the edge within the seam allowance.

If you are using a sheer fabric, you should do this over tissue paper like pattern paper, or over stabilizer so that your sewing machine doesn't eat your fabric. If you are sewing a loose weave fabric, you should stay-stitch all the edges, even the straight ones so that they still measure the same length. This is especially important if you are sewing a plaid loose weave fabric and want the plaid to match up. You don't need to stay-stitch the pieces that are going to have fusible interfacing; that will hold them in shape.

Interfacing
Having cut out all your pieces from fabric and done the stay-stitching, now you can cut and apply the interfacing. Interfacing, for those of you who don't know, is a kind of fabric sold in the notions department, that stabilises fabric and makes it stiffer. There are many different kinds, which come to your attention especially when you venture into tailoring, but the kinds that you will use most often in dressmaking are fusible and sew-in. I will show you how to use both when we cross those bridges.

The peices that need interfacing are:
  • the upper collar or top collar (same thing)
  • the tops of the pockets (to help them keep their shape and not sag)
  • the pocket flaps
  • the inset at the neckline of this style (a sailor dress)
  • the facings (just neck-facings in this style because we have sleeves)
  • the zip area
  • the hems (optional)
  • the "knot" (optional)

It looks like a lot, but they are mostly small things. You use the same pattern piece as you used for the fabric, and on the same grainline. You might think that interfacing doesn't have a grainline, but even the fusible and sew-in kinds that look like tumble dryer sheets stretch more in one direction than in the other. The grain to use is the non-stretch directions.

When you want to know if a piece ought to be interfaced, think if it needs to maintain its shape like collars and plackets do. If you want a crisp appearance, you can interfacing the whole section; if not, you can interface the facing. The crispness is perhaps more noticeable with fusible interfacing.

NB: It is a good idea to preshrink your interfacing by soaking it in hot water for about 20 minutes or until the water cools. You should do the same with twill tape or cotton tape as well. Otherwise, tape could shrink and garment won't (assuming you have preshrunk the fabric) making it uncomfortable and tight.

How to Apply Fusible Interfacing
When you have cut the interfacing out, put it on the WS of it's fabric piece, with the shiny side against the fabric. Then press in place using the instructions on your packet. You may need to press more than once and use a press cloth, especially if your material is sensitive to the iron.

It is hard to say what heat to use. I would say that you ought to start with the temperature that is right for the fabric, and if that doesn't make it fuse, turn it up and use a press cloth.

How to Apply Sew-in Interfacing
If you are using sew-in interfacing, it doesn't matter which way up you have it because there isn't a RS and a WS like on fusible. Just have it match the shape and baste it around the edge inside the seam allowance. The interfacing gets sewn in permanently when the garment seam is sewn. Then you can trim the interfacing's seam allowance to about half to reduce bulk. If it is at a curved edge, you just clip or notch it as you do the garment fabric.

Why use interfacing?
Interfacing helps your garment keep it's shape. It can also change the drape of the fabric and it prevents facings from shifting. It can also give a neater finish to plackets, zips, pocket top-edges, hems, etc.

What about different fabrics?
Silk fabrics, particularly the drapier ones, ought to be interfaced with silk organza because it gives a better finish on such fabrics. Muslin is also a kind of interfacing, but it shrinks to about half it's original size so you must preshrink it. (I know because I made some muslin laundry bags and didn't preshrink it).

I have only used Hemline Sew-in and Fusible interfacings so far, but I expect to learn more about interfacing from Couture Sewing Techniques by Claire Shaeffer which has just arrived as I am writing this post (yippee!)

When you have applied the Interfacing to a Facing...
It is time to neaten the outer edge of the facing, i.e. the edge that will not be part of a seam. You can

  • overlock/serge it if you have an overlocker/serger
  • zigzag it
  • pink it if the fabric does not fray
  • bind it (this is seldom done, because it can add bulk)
  • hand overcast it as I did.
This job can be left until later unless your fabric frays badly, in which case, it is better to do it now.

How to Hand Overcast (AKA Oversew)
When sewing machines were almost universally straight-stitch machines sewers had to neaten edges in other ways. They could bind the edges, pink them, clean-finish, use ribbon to cover the edge and hem it down invisibly to the garment, or use a different kind of seam such as a French seam or a felled seam. One very common way to neaten edges and a way that is used in couture sewing is to overcast or oversew the edges. It's basically half a zigzag.
Some people might use silk thread, but Susan Khalje says to use polyester thread. As I don't have any silk thread, I use polyester and it works fine.


  1. First, you sew a few backstitches on the spot to secure your thread. You can knot it instead if you prefer, but I don't want the knot to come through the weave of the fabric.
  2. Next take the needle over the edge and to the right a little. Bring it through as in the photo above.
  3. Holding the thread at a diagonal with your thumb, repeat step two.
  4. Keep your stitches as neat and even as you can and keep going all the way to the end. 
The size of the stitches will depend on how much the fabric frays. If it frays a lot, use deeper, closer stitches; if it doesn't fray much, you can use slightly wider, slightly shorter stitches. You'll have to use your own good judgement. 

This stitch can also be used decoratively on fabrics that don't fray, or on hemmed edges. Take a look at cowboy clothes and see. : )


NB. If you are left-handed, just "mirror" the instructions. You can also copy the image to paint and flip horizontally if you wish. (Only for your personal use, otherwise please ask first).

I think that's enough for one post. Next week I think we'll make the smaller pieces (or at least some of them such as the pockets, sleeves, inset and bow. We won't apply them until the dress part is sewn.

I hope all that helps!
Until next time, happy sewing!
Sabrina Wharton-Brown
The Sewing Corner Haberdashery, Hornsea, East Yorkshire, HU18 1AP, UK

Labels: ,

Monday 3 October 2011

How to Make a Dress - Part 3: How to Lay Your Sewing Pattern Out On Your Fabric

Now that  you have your pattern ready for cutting (sorry if you have fitting troubles - I just fit my garments when I try them on), you can lay it on your fabric.

Fabric Widths
Fabric often comes 150cm wide. Which you have will affect how much fabric you need and how you lay the pattern pieces on it. Your pattern envelope will tell you how much fabric you need for either of the main widths (see the first post in this series). Inside, on the pattern instructions it will also tell you how to arrange your pattern pieces on your fabric.

Nap
Nap is when fabric looks different one way up than it does the other way up. A prime example of this is velvet - it looks shiny one way and soft the other. But nap also refers to stripes, uneven plaids, prints that obviously have a right-way-up and things of that ilk. Suppose your fabric had little hearts printed all over it in a repeated pattern. That fabric has a nap because it has a right-way-up. You would presumably way all the hearts to be the right way up so you would use the "with nap" layout.


Not all fabrics have a nap, plain linen for instance (like I used on the sailor dress). It looks the same either way up. So what does this mean for you? It means that you can dovetail some fabric pieces so that they fit in better and use less fabric.

Here you can see that the back piece was "dovetailed" so that it fit in better. Because the fabric doesn't have a nap, it doesn't matter which way up the pattern pieces are lain. This means that you can save fabric. Where you would have needed 1.5m with nap, you can probably use only 1m or less without nap.


Layout Pictures on Sewing Pattern Instructions
On the first page of your sewing pattern instructions there are pictures of "lays" (the plans for laying your pattern pieces on your fabric). These are easy to use. You just pick the ones you need for the view you have chosen, and arrange your pattern pieces on your fabric so that it looks like the picture.

There will be lays for the main fabric, for interfacing, and for lining if there is any.

But suppose your fabric is of an awkward width? What then? Well, you put the big pieces down first, then fit the smaller pieces around them. Easy. Just as long as you keep the grain lines correct and pay attention to the nap if there is one, you will be fine.

The Right and Wrong Sides of Fabric
Fabric usually has a right and a wrong side. The right side (often abbreviated to RS) is the side that you will see when the garment is worn. The wrong side (WS) will be the inside.

If you are new to sewing it may be difficult for you to tell the RS from the WS. Sometimes, like when the fabric looks the same on both sides, it doesn't matter. But if the fabric looks different on either side, it does.

If the fabric has a print, the printed side is the RS. If it has a pile, like velvet, moleskin, or faux fur, the pile side is the RS. If it is twill fabric such as cotton drill or denim, the side with the diagonal ribs is the RS.

I hope that helps.
Until next time, Happy Sewing!
Sabrina Wharton-Brown
The Sewing Corner Haberdashery, Hornsea, UK


Labels: ,

Monday 26 September 2011

How to Make A Dress, Part Two: Pattern Markings

I think this series is going to go on for longer than I thought. : )

Last week we looked a sewing pattern envelope; this week we're going inside and will decipher the symbols on a pattern.
We'll start with the grainline. Fabric has what is called a grain. This is the threads that run the long way down the fabric. The grainline has to match this or else the fabrics won't hang right. If you cut off grain your garment can twist when you wear it and become quite uncomfortable.

On the pictures, the ordinary grainline is illustrated on the one on the left. It's the long blue line with arrows on the ends. You just put the pattern piece on your fabric and make sure that the arrows are the same distance as each other from the selvedge or the fold of the fabric.

The other pattern piece has a grainline on which the arrows turn 90 degrees and point to the straight edge of the pattern piece. This is called a foldline and it means that the piece is cut on the fold of the fabric like when you try and cut a symmetrical heart shape out of paper.

Sometimes the grainline is not parallel with the edge of the fabric, but is at a 45 degree, or "bias", angle. You still have to follow the rules as for an ordinary grainline, so the pattern piece will be at a bias angle. Garments are sometimes cut on the bias to take advantage of the draping qualities of bias cut. It takes more care to sew garments this way. Madame Vionnet was the queen of bias cut.


Now we'll look at notches. Look again at the picture. Do you see on the armhole and the shoulder those little triangles? They are called notches, because you cut a notch out of the seam allowance. They help you to sew every thing together in the right place. Not all patterns have them on the shoulder. This one does because there the back shoulder has to be eased to match the front shoulder. You just gather ever so slightly the back shoulder so that it is the same length as the front one. It is easier to do this if you match up the notches (front to back) and pin them. Then you can draw up the easing thread so that the fabric meets with no gaps and no puckers. Then you pin it, baste it, and stitch it. (That wiggly line on the back shoulder tells you that you have to ease there - it is called an ease line).

Anyway, back to notches. Look at the ones on the armhole. There are two on the back and one on the front. This is to help you put the sleeve in the right way around. They match up with the corresponding notches on the sleeve (see the picture to the right). The notch on the top of the sleeve matches up with the shoulder seam on the garment.

(Note: the picture of a sleeve pattern looks weird because it is a rough idea of how a sleeve pattern ought to look. Here is a link with more information: http://www.fashion-incubator.com/archive/sleeve_cap_ease_is_bogus/.)

Another time darts might be used is to mark fold lines:

I have coloured them bright blue on this picture. They are at the top and bottom of the foldline. This pattern piece not be cut on the fold and only one would be cut. It has what is called a cut-on facing - a facing that cut as part of the pattern piece and then simply folded back. Facing the edge this way is especially good for sheer fabrics and for very thick fabrics because it avoids visible seam allowances in sheer fabrics and avoids bulk in thick fabrics.

Also in this picture are buttonhole marks. You just mark these on the fabric with carbon paper and an inkless pen or something. If you have made the pattern longer or shorter where there are buttons you will have to change the position of the buttonholes or it will look like rest of the garment shrank or stretched - kind of like a grown-up wearing their primary school uniform. Just count the spaces between the buttonholes (we'll call that number x), divide the length from the top one to the bottom one by x and mark the buttonholes every x distance. I.e. if the length is 12" and there are 6 spaces between the buttonholes, you have 2" gaps. Measure every 2" inches down from the top buttonhole until you get to the bottom one (which would be the 6th 2" gap). The number of gaps is one fewer than the number of buttons. If you have dramatically changed the length, you may have to add or subtract buttons and use your own judgement as to how many. (I got the formula from Power Sewing by Sandra Betzina which you can find in my Amazon store on this blog.)


Moving on. Looking back at fig. 1 on the bodice front and back you can see two long, narrow triangles. These are darts. Because fabric is flat it would not automatically shrink to fit your waist or grow to fit your bust. So you have to pinch some of the fabric in at the narrow part (waist) and whittle that pinch to nothing near your bust. Hence the triangle you have to stitch (called a dart). Usually on a pattern, there are either notches or circles at the wide end of the dart and a dot at the point. It is a good idea (if your fabric will take marking) to use carbon paper and a tracing wheel to copy the dart onto you fabric. If not, never mind. You will just have to eyeball it when you sew it. (I know "eyeball" is a horrible expression, but what else can I call it? : ))


Anyway, to stay with that topic and move onto the next at the same time, we come to dots and circles. I'll include another picture here to save your constantly scrolling.
Here you can see that the front of the pattern has been copied and traced off to make what is called a facing pattern. A facing is a way of neatening a raw edge that will and keeping it out of sight. At the top and bottom of each centre front there is a small circle. These are not buttons. They are meant to be cut out of the pattern but not the fabric (on unprinted patterns they would be pre-punched). When you have the pattern on the fabric and have cut it out, you make a tailor's tack through the hole. (A tailor's tack is a big, loose backstitch used for marking when chalk won't do. It's removed when you have finished.)

Circles are often used to mark where a pocket goes or where to start and stop stitching on something that is not quite an ordinary seam, like placing appliqué. On a seam, a notch will sometimes show you were to stop stitching, e.g. where a zip goes on a skirt or dress. The dots at the neckline in this drawing might match up with dots on the collar so that the collar is in the right place. (They wouldn't be necessary for putting the facing in place on a simple front like this.)


Now we come to levels. I don't know what they are really called, but they are the little horizontal lines on a sewing pattern that show you where the bust level, waist level, and hip level are.


(Oh, my! I just noticed that the side seams on my quick "sketch" are no where near the same length like as they should be!)


Now we'll look at pleats, and stitching lines.

The grey lines in this picture are the fold lines, and the red lines are the stitching lines. It is best to mark them with different colours on your fabric so as not to get them mixed up. You can mark them with carbon paper or with long running stitches (that is called thread tracing. by the way). You take the fold line, pinching it if you wish, fold it, move it in the direction of the arrow, and place it so that it meets the stitching line. Then you pin it and baste it. It is best to use large cross stitches to baste pleats so as to avoid their moving when you sew. If you are using drapey fabrics you cannot baste pleats in place using your sewing machine, because the presser foot will move the pleats out of position and ruin the look.

Stitching lines, by the way are shown with dashed lines; and cutting lines are marked with solid lines.

That covers most pattern markings. If there are any I have missed or that you are curious about, please ask below.

I hope that helps! Until next time, happy sewing!

(By the way, I thought I was the only one to end my posts that way but have since found out I am not. And they're not copying my either - their posts are older than mine! It's just like when we were looking for a corner sofa. It took us ages to find one. As soon as we got it they were everywhere. You couldn't look at a sofa advert without seeing one!)

Sabrina Wharton-Brown
The Sewing Corner Haberdashery, Hornsea, United Kingdom.

Labels: ,

Monday 19 September 2011

How to Make a Dress - Part One: Your Sewing Pattern Envelope

I have finished the Pretty Little Dresses sample dress. Having taken many photos all the way through, and having also used more techniques than were necessary, I am going to do a series of posts on how to sew a dress. Most of the essential sewing techniques are in it, as they are in all dressmaking projects, so while you may be making another dress for your first attempt I hope these posts will be helpful to you.

First we'll look at the back of a pattern envelope. This is not the envelope for pattern 32101 - it's the envelope of the first dress pattern I used, Simplicity 2927 (now discontinued after about ... FOUR YEARS - when did that happen?!). In case you're curious as to what it looks like, I put a photo to the left.

Anyway, the back of the envelope. I'll only show about half of it because the other side is in French.


Garment Description
At the top it says what it is: Misses' Dress or Tunic with Sleeve Variations. "Misses" refers to the figure type. It means grown-up but not what you would call Plus-size. Sometimes the design's size can range from size 4 to size 20. That doesn't mean the pattern in the envelope is in those sizes. It usually ends somewhere in the middle. This one is in sizes 4 - 12.

Fabrics
Below the "title" is a box that names fabric suggestions. These are fabrics that they have tried the pattern in and they know that they work. Of course, you aren't restricted to the fabrics listed. You can choose a fabric with similar characteristics, i.e. if the fabrics they suggest are generally the kind with a good drape, then you can choose a fabric with a good drape; if they suggest firm fabrics like denim, you can use such fabrics. I suppose you could use any fabric you like, but the fabric you use will affect how the garment will hang, how comfortable it is, and it may require different sewing techniques than are in the instructions, e.g. if the fabrics suggested are thin and drapey, and you use a stiff, thick fabric such as cotton drill or denim, then you will have to use darts instead of the shirring that may be part of the design of your chosen pattern.

If there are different types of garments in your pattern, e.g. a blouse and a skirt, there will be fabrics listed for, say, view A and view B because the blouse can be made up in a flimsy fabric, but the skirt ought not to be, and the skirt could be made in, say, denim, but who would want a denim blouse?

Some patterns are sized only for stretch fabrics, specifically knits (jerseys). They probably don't have openings such as zips or buttons, and may be made rather smaller than patterns made for woven fabrics. Knits also drape better than some woven fabrics. Imagine wearing a t-shirt made of denim - the sleeves would stick out and the hang would be terrible! Plus, it would feel too small and restricting because it wouldn't stretch as jersey does.

Patterns made for knitted fabrics have a bar across the top of the envelope on the back called the Pick-a-Knit Rule. A portion of the bar will be black, the rest white. If you have a piece of knit fabric the length of the black part, it must stretch to the end of the white part in order to fit properly. This stretch, by the way, is on the crosswise grain of the fabric - the stretchier way that goes horizontally around your body when you wear it.

Notions
Underneath the fabric suggestions is a list of the required notions. These are things like buttons, interfacing, zips, hooks and eyes, trimmings etc. that you need to make up the garment properly. They are also called haberdashery. It will say the size of the buttons that best fit the pattern (it does matter). You can have them a little bigger or smaller, say, an eighth of an inch (3mm) but it's probably not wise to go beyond that if you want to keep the original look. Plus, patterns are designed for a particular size of button. If you chose another size, you will affect either the design or the fit of the garment, unless you alter the pattern's front piece(s).

Sizes
Here you can find out which size you are. Pattern sizes are not the same as shop sizes. For one thing, they are consistent among pattern companies (except Burda, who use European sizes). Don't worry if you are not just one size. Patterns nowadays are almost always multisized so if your waist is a size 10 and your hips are a size 12, you just draw a line from the waist at size 10 to the hips at size 12 (the levels are marked on the pattern). And anyway, you can always take it in a bit when you try the garment on. It's easy - really.

By the way, if you wonder what the difference is between the pattern companies, it's that they shape things like crutch lines differently. Some may be a gentler curve, whereas others, like Burda, are almost L-shaped.

Another bit of useful information: a crotch is the between-the-legs part on a person; a crutch is that part on a garment.

Yardage/metreage
Now you have your size, you can find out how much fabric you need. This pattern is a Simplicity Inspired by Project Runway pattern so many of the "design elements" (collars, sleeves, pockets, etc.) are given their own yardage/metreage. E.g. for the dress length in size 10, you would need 1 1/4 yds of 60" wide fabric and 3/8 yd for the neckline and so on. Then you would have to add it all up if you were using just one fabric. If you work in metric that is on the French side which you can figure out by counting the rows (design elements/view) and columns (sizes).

If you are using a pattern that is not a Project Runway one, the designs will be labelled as view A, B, C, etc. depending on which garment you want to make and the whole garment will be given a yardage/metreage instead of it's various parts having their own. You can still separate them when you get the pattern if you wish, you will just have to work out how much fabric you need yourself.

The pattern does not only tell you how much fabric you need, it also tells you how much interfacing and lining fabric you need.

Finished Measurements
Your measurements are not the measurements of the finished garment. If they were you wouldn't be able to move. The amount of extra fabric needed for you to move comfortably is called wearing ease. Garments sometimes have more ease than that for the sake of design. This is called design ease. There is also walking ease in skirts and dresses etc. so that you can walk rather than shuffle.

Designs made for stretch fabrics may have negative ease, i.e. they are smaller than you.  Can you imagine a leotard that was the same measurement as the wearer - or larger? It wouldn't look like a proper leotard at all! More like a babygrow. : )

In the bottom box are the measurements of the finished garment. First is the bust measurement; then the length of each view, either from the nape or from the waist depending on the type of garment; and then, in this case, the dress width. The dress width is the circumference of the hemline. You can get an idea of this by having your tape measure in a circle to this measurement and holding it (probably with your legs wide open) at the finished length.

Back view
The drawings to the left are the back views of the garment. With these (if your eyesight is good) you can see where the zip is (if there is one), and you can see where the darts and seams are. You can also see the back view of the collars etc. If the design is a circle skirt, it will show that too by having one side of the skirt held up level with the waistline.


Well, I think that's enough for one post. If you have any questions or comments, please add them below.

Until next time, happy sewing!
Sabrina Wharton-Brown
The Sewing Corner Haberdashery, Hornsea, UK

P.S. I will be posting on Mondays in future. My brother has just started going to college so I get a peaceful morning (in between customers) for writing. Yesterday I started writing this post and he put (of all things) N-Dubz on the television! How can I concentrate with that on? Still, I love Joe really (couldn't ask for a better brother). : )

Labels: ,

Sunday 11 September 2011

Progress Report on Pretty Little Dresses Pattern 32101, And What I Have Learned This Week


I have added a facing to the neckline of dress 32101, sewed it on, and found out that there was a better way to sew the collar. I sewed it on as you would a Peter Pan collar, but as it turns out, I ought to have sewed the point then turned it RS out, and then sewed the collar to the dress. Anyway, I have done it my way now and it's okay (if a little stiff), because I have put the bow on the front and covered up the points of the collar that were sticking out.

The white parts are actually paper to test some design changes. The collar is the same at the front. I thought it needed lowering or widening, but I think it looks better the way it is. The pockets that I have sewn on are too small and too level so I made a paper one that's wider, with rounded corners and pinned it on at a slight angle.


You can see in the picture that the back of the collar is too short for the design, so I "pin-drew" a new collar shape in (the same as I did for the pocket), measured the extra length, traced the existing collar pattern and extended the back part of it. I cut it out of paper and pinned in onto the dress. I think the new length would be better, don't you?

So my lessons this week?
  1. Before making a pattern for a design feature I have never sewn before, I mustn't assume it's the same as something similar; look for specific instructions (the instructions for sewing a Sailor collar are not in any of my sewing books, even the Reader's Digest one!).
  2. Always include a neckline facing pattern even if you can just turn the top collar seam allowance in and slip stitch it, just in case the sewist wants to use a thicker fabric.
  3. Check the proportions of the collar on the design drawing to make sure they end in the right place on the pattern, i.e. how near the outer edge of the collar is to the shoulder, and how far down the back it is.
  4. When sewing an invisible zip (this was my first one) machine-baste the zip in before you sew in it properly; then really open the coil so that it is more or less a 90 degree angle, have the needle at the very edge of the adjustable zipper foot (I don't have an invisible zipper foot) and sew at an angle so that the zip uncoils itself.
  5. When sewing the facing to the dress at the zip opening, have the seam allowances of the dress free (i.e. not sewn back against the dress), so that you can sew all the way up to the corner by machine.  
  6. Clip the seam allowances in the fold of the hem to give a better edge. (I learned this by watching one of Angela Kane's free videos on her website.) 
  7. When hand sewing a seam or even part of a seam, use a doubled thread (a lesson from my wonderful Mum from when she could sew) and make firm stitches. (I still prefer machine stitches because my hand sewn seams are never firm enough except on muslin.)
  8. Using a thimble takes some getting used to, but can save your middle finger from getting sore. It is also very helpful and appreciated when you have to hand sew or baste through thick fabric or several layers of medium-weight fabric.
  9. When sewing corners, don't take too many stitches at an angle or you will get a rounded point. I think maybe two would be enough on this linen fabric.
  10. Sit in a comfortable place when hand sewing; hunching over a hem while sitting on a small stool does one's tummy no good.
  11. Don't hand sew for too long, and do rest your eyes or things start getting blurry.
  12. Commercial sewing patterns cheat when it comes to sailor collars. Instead of using an inset they just leave the bodice as a crew neck and have the front of the collar flop over it so that it looks like it has an inset.
That's quite a lot when you write it all out!

I'm wondering whether to "cover-stitch" the hem on my sewing machine (I've already done a hand cover-stitch). I have also sewn in the inset which was very tricky, but once I had one side in right the other side was easier to do. I couldn't stitch in the ditch of the collar seam because it never worked out right, so I have stitched it to the dress with the stitching hidden under the collar.

So how do you like the design? Please note that this is the fabric I used because it's the fabric I had. If I were making the dress to match the design, I'd have used cotton: navy for the dress, white for the collar and bow, and red for the tie. Plus, I'd have trimmed the hem with ribbon as in the illustration.

What sewing lessons have you learned this week? Please share them below. : )

Until next time, happy sewing!
Sabrina Wharton-Brown
The Sewing Corner Haberdashery, Hornsea

Tuesday 6 September 2011

And it was all sewing so well... And How to Make a Facing Pattern

Pun intended. : )

Sorry I'm late posting this but I wasn't feeling very well on Sunday and I was getting over it on Monday so I watched the first episode of The House of Elliot on ITV 3. Anyway, I'm here today.

This month and during the end of last month I have been making the test garment of pattern 32101. I have got as far as the attaching the collar and have found that the fabric is too thick (medium-weight linen, by the way). At the end of the seam there are 7 layers counting the zip tape. I know adding a facing adds more fabric, but it I have made a facing pattern for the neckline. I think I will have to rewrite the sewing instructions. It's a good job I take photos all the way through. How else would I remember it all?!

I thought I drafted the sleeves with no cap ease, but I had to ease them to fit as well. I have checked the pattern and there is about 3/8 inch ease in the sleeve. Not too much anyway. I think I must have settled for that. (I can't remember for sure.) I am going to get the Metric Pattern Cutting For Children's Wear and Babywear book so that I can make patterns without sleeve cap ease and with better armscyes.

Anyway, I decided to make a tutorial of how to make a facing pattern, in case you have to make one or want to alter a sewing pattern's design.

How to Make A Sewing Pattern For A Facing

First, put your pattern (that will have a facing) down on your table and put some tracing paper (I use greaseproof paper) on top.

I have a tracing wheel ready in the photo, but I found that a pencil was more accurate for this and used that instead.

(Note: I was looking through my issue of SewStyish and found a photo of a needle-point tracing wheel, which my tracing wheel does not look like and isn't. Mine is serrated. I wonder if there is an advantage to having a needle-point tracing wheel?)

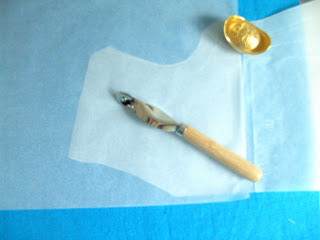
The sewing pattern already has seam allowances on the neckline and shoulder seam so I can just draw the facing in without adding them. A facing is usually about 2ins (5cm) deep/wide so I'll add that to the seam allowance width of 5/8 inch (1.5cm) to get 2 5/8 inches (6.5cm) and measure that far in along the neckline, starting at the shoulder and the centre front (C.F.) and then along the rest of the neckline.

(By the way, those "pattern weights" are actually Chinese Ingots -- their version of gold bricks in ancient times. Real ones were sometimes used as money. These are made of brass I think. My Mum and Dad used to sell them in our online shop All About Feng Shui until Dad got too poorly for us to continue the business.)

I don't know how well you can see it in the picture, but I have marked out 6.5cm in from the neckline so that I can get am even curve, which I drew in the next picture:


Then you just cut it out and write the pattern information on it. You can write on it first if you wish, but this is the order I did it in.


The information on the pattern is: The pattern number (32101); the pattern piece name (front neck facing); the figure type and size (girl's, 3); the cutting instructions (Cut 1 on fold of self, Cut 1 on fold of interfacing).

Then you just repeat it for the back facing piece.

So that is how you make a facing pattern.

I first had to make one for a jacket that never turned out right. As the collar never worked out (I tried the pattern twice), I avoided wasting the fabric by turning it into a collarless jacket. The sleeves still feel miles too big, as do the armscyes. I will one day make a jacket pattern the way I want it -- with smaller armscyes and slimmer fitting sleeves. But for now I'm busy.

It is best not to use this method for lowering necklines, especially on loose designs, because they might gape. It is best for closer-fitting things or for removing collars from designs.

Until next time, Happy Sewing!
Sabrina Wharton-Brown
The Sewing Corner Haberdashery, Hornsea.

Labels:

Sunday 7 August 2011

"What does this sewing term mean?" The Sewing--English Phrasebook for Beginners

It has come to my attention that many new sewists (I say "sewists" because the word "sewer" could be taken to mean the things that have manholes) get stuck with the words they find in sewing patterns and books. I had a bit of trouble with some when I started sewing, then I got used to them, and now I just use them naturally. So I have put together a list of some of the most important ones I could think of. If you can think of any more, or want to know something, please comment below.

Seam allowances are the distance between the edge of the fabric and the stitching line. Seam allowances are sometimes also called "margins" (but not very often). Other kinds of "allowances" are the amount of fabric allowed for something, e.g. a hem.


GRAIN
Imagine you were weaving your own fabric. To start you set up the lengthwise threads on the loom. Then you start to weave the sideways thread in and out, between each lengthwise strand. When you get to the end of one row, you have to turn around and go back across. As you keep doing this you build up your cloth.

The lengthwise threads are called the warp, and the "across" threads are called the "weft" (in the old days they were called the "woof"). I remember it by thinking that when you have the fabric hung up on the loom, the warp threads may warp, and when you are weaving, you send the weft threads "weft and wight" (left and right).

The left-hand and right-hand sides of the cloth where you turn the shuttle to go back across are called the selvedges and they are naturally tighter than the rest of the cloth. If they weren't they might be loopy and get caught on things, plus the cloth would be of poor quality. I think sometimes, the selvedges have thicker warp threads for strength.

The grain-line is the lengthwise thread and when you have your pattern lain on the fabric, the long line with the arrows has to match this. You make sure they match by measuring from one end of the line to the fold of your fabric, then repeat with the other end. If they match, your pattern is properly aligned. If the line has the arrows pointing away from the line at a 90 degree angle, the arrows are pointing towards the fold of the fabric, indicating that this piece is to be cut on the fold (and not have the fold cut).

There is also the cross-grain, which is perpendicular to the grain-line. It is the weft threads.

The bias is at a 45 degree angle to the grain-line. It's stretchier than the grain-line and the cross-grain and that is what they use for bias-binding, hence the name "bias-binding".

Selvedge: When I started my first dressmaking project, I didn't know what the selvedge was. It's the side edge of the fabric. If you look closely you can see it has little holes in it (where it was held on tenterhooks when they dyed it). It is best not to use the selvedge as a seam allowance because (I think) it can shrink more than the rest of the fabric so it would ruin your seams. By the way, before you cut your fabric it is usually advisable to wash and dry it so that if it shrinks, your garment will not shrink after you cut the piece out.

MARKS ON THE PATTERNS
A notch is the little triangle on the cutting line of the pattern piece. When you are putting the garment pieces together, you match these up.

Dots or Circles are important too. They help you to get facings and pockets and things in place properly and accurately. You punch a little hole in the circle with your scissors or awl, and mark the fabric underneath with a tailor's tack. Then, when it comes time to put the pocket or whatever it is on your garment, you just match up the tailor's tacks. You may find it helps to use pins to make sure things are lined up.

OTHER SEWING TERMS
Facings are pieces of fabric cut to match or nearly match the shape of the edge of the fabric you are neatening, such as at a neck-hole or an armhole. They are sewn on, clipped or notched, and turned inside the garment. Then you can under-stitch the facing to the seam allowances.

Hem is a turned up or tuned under edge of fabric. It usually means the turned up, bottom edge of your garment. A false hem is not really a hem; it's a faced edge at the bottom of your garment.

Under-stitching is what you call it when you sew just the facing to the seam allowances. You can do it by machine most of the time, but sometimes, like on collars, you have to do it by hand because you can't get to it by machine. If you don't want to under-stitch, you can top-stitch instead. That just means that you sew so that you can see the stitches on top.

Interfacing is a type of material that looks like tumble dryer sheets and goes between the garment and the facing. It is usually applied to the facing by either pressing (if it is iron-on) or basting (if it is sew-in). It's purpose it to give the garment structure, i.e. keep it in shape. It's very important for waistbands unless you are using Petersham (also called waistband ribbon).

Ease is very slight gathering. It is usually done at the top of a sleeve. It has to be very slight because you are not meant to get any puckering. You can ease and stay-stitch  at the same time (called "super stay-stitching") by putting the sleeve cap under the presser foot on its own at the first notch and, while you are sewing a little way inside the seam allowances and nearish the stitching line, push with your finger against the back of the presser foot so that you stop the fabric from going through so much. When it gets too built up, let it go a bit and push again like before for the next lot. Keep going until you get to the other notch. Then your sleeve is ready to go into the sleeve hole (called "setting the sleeve"). Even if you have a sleeve with no ease, it seems you have to still ease it in because of the seam allowances.

Stay-stitching is when you sew along the edge of one layer of fabric to stop it from stretching out of shape. Have this line of stitching near the stitching line and in the seam allowance. You must stay-stitch all curved edges and bias edges. If you are sewing loosely woven fabric, it is best to stay-stitch all edges (especially if you are sewing plaid, as I found out a while ago.)

Basting is temporary sewing. When you have pinned the fabric together, you can sew it by hand with a longer-than-usual running stitch to keep it in place without pricking yourself. If you are basting pleats in place, you can do so more securely if you sew a cross-stitch on the spot a few times. Some people like to baste on their sewing machines by using a longer straight stitch, but I prefer to baste by hand because it is easier and, in my experience, gives better results.

An under-collar differs from a top-collar in that it is a little smaller and is often cut on the bias. When the collar is attached to your garment, the under-collar will be underneath the top-collar. (I mention this because for a while the matter of an under-collar confused me somewhat.) BTW, it is the top-collar that is interfaced to keep it crisp.

Turn of Cloth Imagine you have a sandwich and you fold it in half. The top slice of bread would end up looking shorter than the bottom one at the edges. The difference in visible length in this instance is refered to as "turn of cloth" (when it is fabric). Undercollars have to be a bit smaller than top collars so that when the collar is turned over, it lies properly. If we didn't allow for the turn of cloth, the top collar would pull the seam upwards and the undercollar would be all wibbly-wobbly (for want of a better word) underneath. The usual allowance for turn of cloth is an eighth of an inch (about 3mm), but more may be required for thicker fabrics such as coat fabrics.

Grading a seam is when you trim one of the seam allowances after sewing the seam. This makes the seam lie more smoothly when it is pressed to one side.

Have I missed anything? If there is a sewing term you would like explained, please ask below, and I will add it to this post if I know it.

Sabrina Wharton-Brown
The Sewing Corner
Hornsea

Labels:

Sunday 31 July 2011

"Sewing Machine Presser Feet Cheat Sheet"

Back in the '20s and such times when sewing machines only sewed a straight stitch, they came with a selection of attachments instead. There were surprisingly many. They didn't call them presser feet though, they called them attachments. The only one that was called a presser foot was the straight stitch foot.

Some of those old, antique attachments are now manufactured to fit modern sewing machines better, but some have (sadly) been left in the past or "updated" (sigh, still not the same).
For now, let's look at some of the more popular (and handier) presser feet and attachments made for our modern sewing machines.


These are standard presser feet. This kind of foot has quite a few names: the standard foot, zigzag foot, universal presser foot, all-purpose foot, and general purpose presser foot. It doesn't really matter what you call it unless you are buying one and have to tell the salesperson or search engine. It has a wide needle hole that fits the widest stitch on your sewing machine.

In case you are wondering what that little black button is, it's a foot leveller. If you are starting sewing a seam on thick fabric, you push that button in before you lower the presser foot and it holds the presser foot level. When the hole foot is supported by the fabric, the button will pop out again. It works only with the shank that has a hole in the right place for the pin on the button, so if it didn't come with your sewing machine, it probably won't work on it.

This is a two-sided zipper foot. It snaps onto your sewing machine like any other snap-on presser foot, but instead of snapping on in the centre, you snap it onto either the left or the right side of the centre of the foot. It lets you get closer to what you are sewing than you can get with the standard presser foot.

https://www.singermachines.co.uk/sewingmachineparts/feet/singer-blind-hem-foot.html
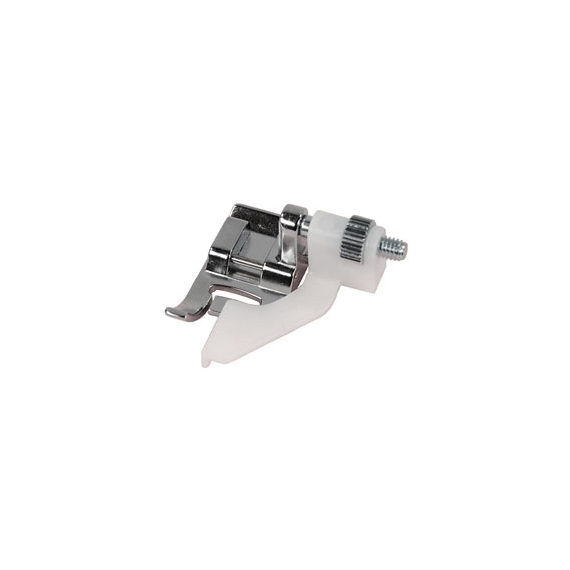

This is an Adjustable Blind Hem Foot. You turn that little wheel on the right-hand side to move the white guide left or right. The fold of the fabric buts against the guide and the machine sews a blind hem, catching just a little of the fold in the swing of the stitch. There are instructions for machine sewing a blind hem on this blog.


This is an overlocking foot, also called an Overcasting Foot, even though it is for a sewing machine and not for an overlocker/serger. There is a metal guide against which you butt the edge of the fabric. Using a zigzag stitch or any other overcasting stitch on your sewing machine that will fit, you neaten the raw edge to prevent it from fraying. When I say "that will fit" I mean that won't have the needle hit the guide of the foot on its way down.
If your sewing machine's zigzag stitch is centerised as opposed to being always aligned to the right, this foot is near essential for overcasting because you can't use the sewing machine needle plate as a guide on such a sewing machine.


This is a Satin Stitch Foot, also called a monogramming foot, and possibly an embroidery stitch foot. It looks very like a standard presser foot, except it may be wider and it has a deeper tunnel underneath for the denser stitching to go through smoothly. If you tried satin stitching with your standard presser foot, the fabric might not feed through because the stitches wouldn't fit under your standard presser foot. It would be like trying to get a lorry under a too-low bridge.

It is to be used for decorative stitches only, and not sewing seams because, due to the higher tunnel; I don't think it will hold the fabric down against the needle plate flat enough.

Back when sewing machines usually did only a straight stitch, they invented a zigzag attachment. You could put different cams on top of the Singer one and they would sew different decorative stitches.

http://www.april1930s.com/html/singer_adjustable_zigzag_attac.html

http://www.youtube.com/watch?v=hgHQW38MWYE&feature=related


This is a Button Sewing Foot. You use it with the feed dogs down or covered because you want the fabric and the button to stay put.

It goes on your sewing machine with the blue end facing you and the button underneath. Then you set your sewing machine at a zigzag stitch whose width lets the needle go down the holes on the button. If you want to have a thread shank on the button, you put a matchstick or something like that on top of the button between the holes. That makes the stitches take more thread. When you have finished stitching the button on, you leave long thread tails, bring them under the button and wrap them around the threads. Then you bring them to the back of your fabric and tie them off.


These are buttonhole feet. The small one (called a Sliding Button Hole Foot) is for a four-step buttonhole and the bigger one (called an automatic buttonhole foot) is for a 1-step buttonhole.

With the sliding buttonhole foot you have to measure the button and make the buttonhole in 4-steps on your sewing machine. You cannot use this foot on a sewing machine that makes a 1-step buttonhole.

With the automatic buttonhole foot, you just fit your button in the gauge at the back of the foot, lower the presser foot, and pull down the buttonhole lever on your sewing machine. It is important to raise the lever after every buttonhole and pull it down when the presser foot is down because if you don't you may not get good buttonholes - one side will be shorter than the other.

There are a few other kinds of buttonhole feet, like the Bernina Buttonhole foot and the Janome Long-Buttonhole Foot, but your instruction manual or manufacturer's website should tell you more about them if you have them.

In the old days they made an attachment called a buttonholer. It was like an extra machine that attached to your sewing machine. They could also be used to make satin stitches on a straight stitch sewing machine! Apparently you can you them on modern sewing machines but get better results on the vintage kind they were made for. http://www.april1930s.com/html/singer_buttonholer.html


This is a concealed zipper foot, also called an Invisible Zipper Foot. An invisible zip is different to an ordinary zip in that the chain is on the inside; they are also curled up. When you sew it on you have to get into the groove and stitch it onto the stitching line of your garment. The foot has two tunnels underneath for the coils to travel under. The foot helps uncurl them as you go, making the job a lot easier than it would be if you were to put an invisible zip in with an ordinary zipper foot or an adjustable zipper foot.
There are videos on YouTube of how to do insert invisible zips.


This is an Adjustable Zipper Foot, also called an adjustable piping foot or an all purpose zipper foot.

The bar on the right is where the slide is. This controls how far left or right the foot is - hence adjustable zipper foot. Make sure you tighten the screw on the bar as far as you can or the foot will move forward when you lower it and will cover the needlehole. For some reason, the stitch automatically shortens by about 0.5mm unless you have stablizer or something top and bottom. I think it's because there is less of the fabric in contact with the feed dogs.

It is essential for sewing piping that won't fit under the two-sided zipper foot, e.g. welting in soft-furnishings.

This is actually a really old style of presser foot. They made them for the old Singers. http://www.april1930s.com/html/narrow_zipper_cording_foot_att.html


This is a Darning/Free Motion Quilting Foot. It has a spring on it that works in unison with the needle; when your needle goes down, so does the presser foot, when the needle goes up, the presser foot is above your fabric so that you can move it around as you wish, even though the presser foot lever is down.
You use this foot with the feed dogs down or covered.

To darn with it, you put the fabric in a hoop and sew back and forth across the rip and then left to right across it in a thread colour-matched to the fabric.

It looks a lot like the Free-motion Embroidery foot except that the bottom of the foot is a whole shape, and the one on the Free-motion embroidery foot is open-toe, i.e. it has a gap at the front.

They had these for antique sewing machines as well. I wonder if any of our attachments are new ideas?
http://www.april1930s.com/html/singer_featherweight_222k_embr.html

I think a free-motion quilting foot is probably tougher for heavier weights of quilting.


This is an Edge Joining/Stitch in the Ditch Foot foot. It has a metal guide down the centre. It is used to join edges, and you can also use it as a guide for top-stitching near edges, and for making pin tucks.
To use it to join edges you have one piece of fabric with its edge on the left-hand side of the guide, and another piece of fabric with its edge against the right-hand side of the guide.

If you would like to see the antique version of this foot and how it's used, take a look at this website: http://www.april1930s.com/html/singer_edge_stitcher_attachmen.html

Personally, I rather like the antique version. You could still make pin-tucks with it. I wonder if they made the new kind to take thicker fabrics?

I have found a foot almost exactly like the antique one, but manufactured now! It is part of a set at Amazon.com. I'm not sure whether they are available in the UK, though

http://www.amazon.com/Distinctive-Rolled-Hemmer-EdgeStitcher-Package/dp/B0035UU8VI/ref=pd_sbs_ac_4


This is called a 1/4-inch Foot. This one has a metal guide along the right-hand side to keep your fabric aligned. The little notches on the left-hands side are so that you can pivot and keep the seams equal.


This is a Gathering Foot. The longer your stitch, the more gathered your fabric will be. The fabric you put underneath your gathering foot is the fabric that will be gathered. There is a slot for you to put another piece of fabric through. The fabric in the slot won't gather. This is so that you can make a gathered piece of fabric and sew it to a flat one at the same time.
You can do that with a Ruffler foot, but the gathering foot is cheaper (because it does less and is easier for them to make).

This is a binding foot. It works kind of like a bias binding maker in that it curls the fabric into the right shape as you go. The advantage is that it sews the binding to the edge at the same time. There are different sizes available for different sizes of binding. The size refers to how wide the binding will be when folded in half and stitched onto your fabric, so it's half the size of the bias binding.


If you have already pressed your bias binding or if you bought it ready-made, you may prefer the Adjustable Binding Foot, which is also called a taping foot. It can take various widths of bias binding and tapes. It won't curl the binding for you, but that is already done if you have purchased binding or if you have used a bias binding maker.

You can see the little wheel in the lower right-hand corner of the picture. That moves a guide inside the plastic bit of the foot to keep the binding in place as you sew it to your fabric.


These are Narrow Rolled Hem Feet. They come in various widths and take a bit of practice to use. You can use them to make a narrow rolled hem on your sewing machine. The narrower ones are for fine fabrics like chiffons and silky fabrics, but you can use the much wider ones (e.g. 3cm) for medium weight fabrics like ordinary cottons and so on. I don't know about heavier/thicker fabrics.

There are variations of these feet such as the picot edge feet with which you use a zigzag stitch or an over-casting stitch with higher-than-usual upper tension. It is supposed to bring the edge of the fabric up a bit so that when you have the fabric flat, there is a picot edge. There is also the felling foot which allows you to more easily make seams like those on the back of your jeans (felled seams).


This is a Walking Foot, also called an Even Feed Foot. How does it work? Well, you know how your sewing machine has feed dogs that push the fabric through? Well, sometimes when you are sewing several layers of fabric, such as in quilting, the top layer doesn't go through at the same speed as the bottom one because it has nothing to push it through simultaneously. This means that when you get to the end of your seam, looks like one piece of fabric is longer than the other.

That is where the Walking Foot come in. It has some 'feed dogs' in it that push the upper layer through so that both layers go through at the same rate, hence even feed.

There is also an open-toe version of this foot so that you can more easily see where you are stitching.
If you have a Pfaff with Integral Dual Feed, you don't need one of these; your sewing machine will do it for you. The same is true if you have a Janome Horizon.

The stick-thing that is next to the foot in the photo (that looks like a shepherd's crook) is a seam guide. You slide the bar of it through the correct part on your shank, and the hook bit, which is at a right angle to the bar, works like the stitching guides on your needle plate, but you can adjust how far it is from your needle. This doesn't always come with your Walking Foot, and may be available separately.


This is a Pintuck Foot. You use is with a twin needle. There are tunnels underneath that make the pin tucks. The guides also help to keep your twin-needle pin-tucks parallel. If you put a strand of cord underneath your stitching the pin-tuck you are stitching, you can make corded pin-tucks. Some sewing machines have guides available for the cord.

There are a few different pin-tuck feet with different sizes of tunnels and different numbers of tunnels.


This is a Cording Foot. Can you see the little tunnels on the top in front? They are for the cords to go through. I think on this one you can 'clip' them in by sliding them under the little sticky-up bit at the side of the tunnels.

You can use this foot to sew over a number of cords at once and have them all be parallel.
There are different cording feet available for different quantities of cords.


This is a Welting Foot. It is a bit like an invisible zipper foot except that the tunnels are bigger underneath (it looks like a toad-in-the-hole with the sausages removed). You can use it to sew right up close to the welting (which is like thicker cording).


Labels: